Pod中container的状态小结
Contents
一 pod中container的状态包含哪些内容
- container id;
- container image id;
- lastState:如果该container发生过重启,那么它在重启之前的状态;
- container name;
- 是否ready;
- 重启次数;
- 是否启动;
- container state;
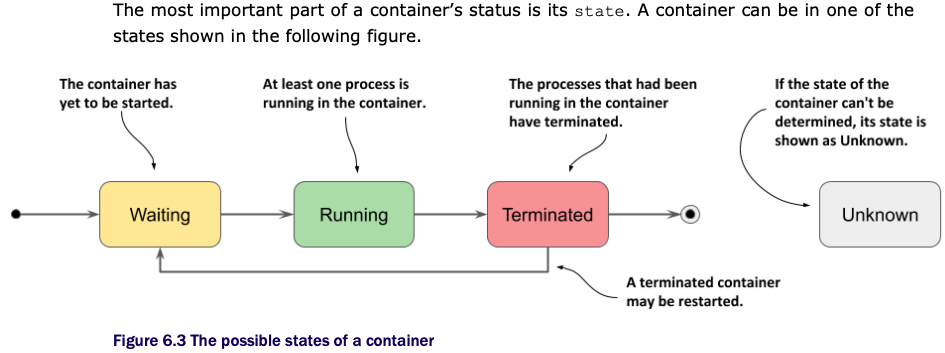
二 pod中container可能有哪些状态
三 如何查看pod中container的状态
由于container status是在其所在pod的yaml文件中的status字段下的containerStatuses字段的。所以,我们可以通过获取pod的yaml文件来查看container状态。
kubectl get pod pod_name -o yaml;
四 pod中container status字段中的lastState表示什么意思
表示当前container如果发生过重启的话,那么它在重启之前的状态的详细信息。如果该container没有发生过重启,那么该字段值为空,用{}表示。
实验如下,我们的pod curl中的container main发生重启前后,查看其状态发生的变化。
1 查看pod状态,curl没有发生重启
[root@master-node ~]# kubectl get pods -owide
NAME                       READY   STATUS      RESTARTS   AGE   IP             NODE     NOMINATED NODE   READINESS GATES
curl                       1/1     Running     0          11d   10.244.2.245   node-2   <none>           <none>
curl-with-ambassador       2/2     Running     0          33d   10.244.1.47    node-1   <none>           <none>
downward                   1/1     Running     0          34d   10.244.1.45    node-1   <none>           <none>
fortune-configmap-volume   2/2     Running     0          41d   10.244.2.235   node-2   <none>           <none>
fortune-https              2/2     Running     0          41d   10.244.2.236   node-2   <none>           <none>
my-job-jfhz9               0/1     Completed   0          11d   10.244.2.244   node-2   <none>           <none>
[root@master-node ~]#
2 pod重启前,查看其container状态:
[root@master-node ~]# kubectl get pod curl -oyaml
apiVersion: v1
kind: Pod
metadata:
annotations:
kubectl.kubernetes.io/last-applied-configuration: |
{"apiVersion":"v1","kind":"Pod","metadata":{"annotations":{},"name":"curl","namespace":"default"},"spec":{"containers":[{"command":["sleep","9999999"],"image":"rancher/curl","name":"main"}]}}
creationTimestamp: "2022-05-09T15:23:37Z"
name: curl
...
status:
conditions:
containerStatuses:
- containerID: docker://9d56be349349b7581a4178b11895167b5be8c1c68ce1630f440389a1e8257a35
image: docker.io/rancher/curl:latest
imageID: docker-pullable://docker.io/rancher/curl@sha256:85aea1846e2e9b921629e9c3adf0c5aa63dbdf13aa84d4dc1b951982bf42d1a4
lastState: {} #container在重启之前,上一次的状态是什么
name: main
ready: true
restartCount: 0
started: true
state:
running:
startedAt: "2022-05-09T15:23:50Z"
hostIP: 172.16.11.161
phase: Running
podIP: 10.244.2.245
podIPs:
- ip: 10.244.2.245
qosClass: BestEffort
startTime: "2022-05-09T15:23:37Z"
[root@master-node ~]# 此时,看到lastState字段值是空的,用{}表示。
3 到worker节点上,重启container:
这里,通过手工杀掉container,然后Kubernetes会自动启动1个新的container。重启前,container的id是9d56be349349,重启后,id是1a6248a37743。
[root@node-2 ~]# docker ps|grep curl
9d56be349349        docker.io/rancher/curl@sha256:85aea1846e2e9b921629e9c3adf0c5aa63dbdf13aa84d4dc1b951982bf42d1a4                            "sleep 9999999"          11 days ago         Up 11 days                              k8s_main_curl_default_6ce37a07-b540-49e7-a945-01cf58e58895_0
0cb54d805405        registry.aliyuncs.com/google_containers/pause:3.5                                                                         "/pause"                 11 days ago         Up 11 days                              k8s_POD_curl_default_6ce37a07-b540-49e7-a945-01cf58e58895_0
[root@node-2 ~]# docker stop 9d56
9d56
[root@node-2 ~]# docker ps|grep curl
1a6248a37743        docker.io/rancher/curl@sha256:85aea1846e2e9b921629e9c3adf0c5aa63dbdf13aa84d4dc1b951982bf42d1a4                            "sleep 9999999"          10 seconds ago      Up 9 seconds                            k8s_main_curl_default_6ce37a07-b540-49e7-a945-01cf58e58895_1
0cb54d805405        registry.aliyuncs.com/google_containers/pause:3.5                                                                         "/pause"                 11 days ago         Up 11 days                              k8s_POD_curl_default_6ce37a07-b540-49e7-a945-01cf58e58895_0
[root@node-2 ~]#
4 回到master node再次查看pod中的container状态:
注意,查看lastState字段的变化。
[root@master-node ~]# kubectl get pod curl -oyaml
apiVersion: v1
kind: Pod
...
status:
  conditions:
  - lastProbeTime: null
    lastTransitionTime: "2022-05-09T15:23:37Z"
    status: "True"
    type: Initialized
  - lastProbeTime: null
    lastTransitionTime: "2022-05-21T06:56:40Z"
    status: "True"
    type: Ready
  - lastProbeTime: null
    lastTransitionTime: "2022-05-21T06:56:40Z"
    status: "True"
    type: ContainersReady
  - lastProbeTime: null
    lastTransitionTime: "2022-05-09T15:23:37Z"
    status: "True"
    type: PodScheduled
  containerStatuses:
  - containerID: docker://1a6248a377436d56923d8e2188801d0721acce386564c011bd8b6669e79709df
    image: docker.io/rancher/curl:latest
    imageID: docker-pullable://docker.io/rancher/curl@sha256:85aea1846e2e9b921629e9c3adf0c5aa63dbdf13aa84d4dc1b951982bf42d1a4
    lastState:                          #container发生重启之后,可以看到关于重启之前的更多信息
      terminated:
        containerID: docker://9d56be349349b7581a4178b11895167b5be8c1c68ce1630f440389a1e8257a35
        exitCode: 137
        finishedAt: "2022-05-21T06:56:33Z"
        reason: Error
        startedAt: "2022-05-09T15:23:50Z"
    name: main
    ready: true
    restartCount: 1
    started: true
    state:
      running:
        startedAt: "2022-05-21T06:56:39Z"
  hostIP: 172.16.11.161
  phase: Running
  podIP: 10.244.2.245
  podIPs:
  - ip: 10.244.2.245
  qosClass: BestEffort
  startTime: "2022-05-09T15:23:37Z"
[root@master-node ~]#
五 查看包含initContainer的pod和所有containers状态的例子
通过执行作者提供的示例(代码仓库地址是:https://github.com/luksa/kubernetes-in-action-2nd-edition.git ),创建包含initContainer的pod,该pod的完整代码如下:
[root@master-node Chapter05]# pwd
/root/kubernetes-in-action-2nd-edition/Chapter05
[root@master-node Chapter05]# ll
总用量 36
drwxr-xr-x 2 root root   68 5月  21 14:53 init-demo-0.1
drwxr-xr-x 3 root root   66 5月  21 14:53 kiada-0.2
drwxr-xr-x 2 root root  104 5月  21 14:53 kiada-ssl-proxy-0.1
drwxr-xr-x 2 root root   68 5月  21 14:53 network-connectivity-checker-0.1
-rw-r--r-- 1 root root  566 5月  21 14:53 pod.kiada-init.custom-ip.yaml
-rw-r--r-- 1 root root  507 5月  21 14:53 pod.kiada-init-slow.yaml
-rw-r--r-- 1 root root  481 5月  21 14:53 pod.kiada-init.yaml
-rw-r--r-- 1 root root  337 5月  21 14:53 pod.kiada-ssl.yaml
-rw-r--r-- 1 root root  224 5月  21 14:53 pod.kiada-stdin-once.yaml
-rw-r--r-- 1 root root  217 5月  21 14:53 pod.kiada-stdin-tty.yaml
-rw-r--r-- 1 root root  199 5月  21 14:53 pod.kiada-stdin.yaml
-rw-r--r-- 1 root root  177 5月  21 14:53 pod.kiada.yaml
-rw-r--r-- 1 root root 2494 5月  21 14:53 README.md
[root@master-node Chapter05]# cat pod.kiada-init.yaml
apiVersion: v1
kind: Pod
metadata:
  name: kiada-init
spec:
  initContainers:
  - name: init-demo
    image: luksa/init-demo:0.1
  - name: network-check
    image: luksa/network-connectivity-checker:0.1
  containers:
  - name: kiada
    image: luksa/kiada:0.2
    stdin: true
    ports:
    - name: http
      containerPort: 8080
  - name: envoy
    image: luksa/kiada-ssl-proxy:0.1
    ports:
    - name: https
      containerPort: 8443
    - name: admin
      containerPort: 9901
[root@master-node Chapter05]#
然后通过kubectl get pod kiada-init -oyaml 来查看pod的state和状态、以及container和initContainer的状态。这里,篇幅限制,只贴出重要的信息:
[root@master-node ~]# kubectl get pod kiada-init -oyaml
apiVersion: v1
kind: Pod
metadata:
spec:
  containers:
  - image: luksa/kiada:0.2
    imagePullPolicy: IfNotPresent
    name: kiada              #pod中的第1个container
   ...
  - image: luksa/kiada-ssl-proxy:0.1
    imagePullPolicy: IfNotPresent
    name: envoy              #pod中的第2个container
   ...
   initContainers:
  - image: luksa/init-demo:0.1
    imagePullPolicy: IfNotPresent
    name: init-demo          #pod中的第1个initContainer
    ...
   - image: luksa/network-connectivity-checker:0.1
    imagePullPolicy: IfNotPresent
    name: network-check      #pod中的第2个initContainer
...
status:
  conditions:                #pod的conditions
  - lastProbeTime: null
    lastTransitionTime: "2022-05-22T08:17:02Z"
    status: "True"
    type: Initialized
  - lastProbeTime: null
    lastTransitionTime: "2022-05-22T08:18:32Z"
    status: "True"
    type: Ready
  - lastProbeTime: null
    lastTransitionTime: "2022-05-22T08:18:32Z"
    status: "True"
    type: ContainersReady
  - lastProbeTime: null
    lastTransitionTime: "2022-05-22T08:16:42Z"
    status: "True"
    type: PodScheduled
  containerStatuses:          #pod中第1个container的状态
  - containerID: docker://a99ca
  ...
  - containerID: docker://cded #pod中第2个container的状态
  ...
  initContainerStatuses:
  - containerID: docker://83bf #pod中第1个initcontainer的状态
  ...
  - containerID: docker://1984 #pod中第2个initcontainer的状态

  phase: Running      #pod的phase字段。
这里,可以看到在pod的yaml文件中,如果包含有initContainer的话,可以看到initContainer的状态。
六 参考
《Kubernetes in Action Second Edition》 Marko luksa
Chapter 06 managing the lifecycle of the Pod’s containers P146–P148.
延伸阅读:
上一篇文章中,我们涉及到了 如何查看和分析Kubernetes中pod的phase、conditions?它们有什么作用?

2条评论
Pingback:
Pingback: